Image Editors
Image optimization is both an art and a science. There are many tools and techniques that can help with this process.
- The most popular tool for professional designers and photographers is Photoshop.
- Provides the ability to resize an image while retaining the aspect ratio and saving files in many popular file types (.png and .jpg).
- Offers a powerful “Save for Web” option that shows you a preview of what your image will look like with different optimization settings. The “Save for Web” option also tells you an estimated time that the image will take to download.
- There are free alternatives to Photoshop.
- GIMP can be downloaded. The options are not as feature rich and online training might be difficult to find.
- MS Paint and iPhoto will be helpful to resize your images but do not offer image optimization for the web.
- It is recommended that you work with a web designer so that the end results of your images look great but also load quickly at the same time.
Size Recommendations for Template Images
Images generally should be prepared for the website in the sizes that meet your needs. NIC Wisconsin provides guidelines for images with specific purposes in the agency templates. Image dimensions are typically stated in pixel width by pixel height. The image file size should be close to the sample images given.
- Header Logo (90px x 90px)
- Feature Image for Next Design
- 800px x 600px, less than 300kb
- Background Image Tile and Simple (Note: both sizes are required):
- For small devices (600px x 325px), 130kb
- For large devices (1600px × 500px), 147kb
- Call to Action (CTA) images on the Home page of the Simple or Next Design templates
File Naming
- Follow the naming convention that’s been established for the website.
- The name can be used to describe the purpose of the image, especially for a Slider or a Call to Action image. Examples:
- HomepageSliderImage_1.jpg, HomepageSliderImage_2.jpg
- CTAImage_1.jpg, CTAImage_2.jpg
Uploading Images to a SharePoint Library
Once images have been optimized, they are ready to be uploaded to the SharePoint Images Library.
Tip: Options for editing are limited once an image has been uploaded and added to a page. Have your images optimized and resized before uploading to SharePoint.
We recommend that you keep this library organized
- Add folders to keep your images organized
- Suggested practice is to name folders without spaces and in CamelCase to keep the URL clean, such "VehicleDMV".
Steps for uploading images:
- To open the Images Library, click on the dark blue square icon next to the Images Library title in Site Contents.
- On the ribbon Files tab, click the down arrow below New Document, and click Image .
- In the Add a document dialog box, browse the files on your computer and select the image you want.
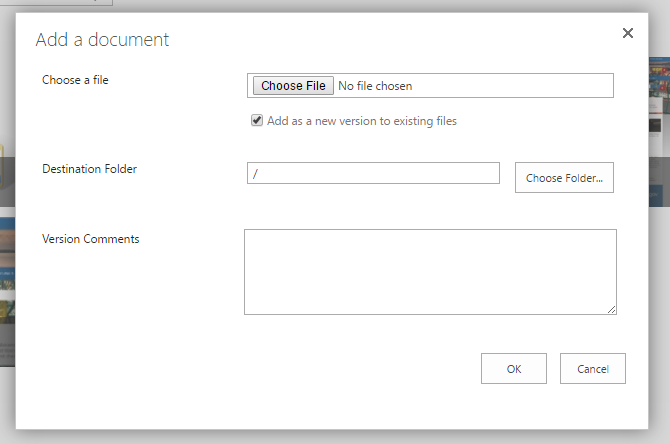
- Click Open, then click OK.
- Optionally, you can enter additional, optional, metadata about the image, including:
- Title
- Keywords
- Author or copyright
- Note: Search engines will evaluate the metadata to help decide a webpage’s relevance.
- Click Save when done.
Adding an Image to a Page
- Navigate to the page where you want to add the image.
- On the ribbon
Page tab, click the
Check Out icon to check out the page, then click the Edit icon at the far left of the ribbon to enter edit mode.
- Place your cursor in the content area where you want to insert the image.
- On the ribbon
Insert tab, click the down arrow below the Picture icon and choose the image source.
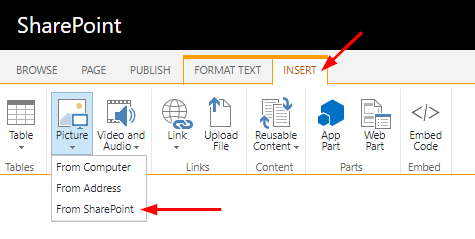
NOTE: We recommend uploading your images to SharePoint ahead of time and then choosing “From SharePoint”. It is HIGHLY recommended you do not use "From Address" as you may not have control over that source image.
- The
Select an Asset dialog box will display the files that have been uploaded to the Images Library.
Select the image you want to add to the page, then click Insert.
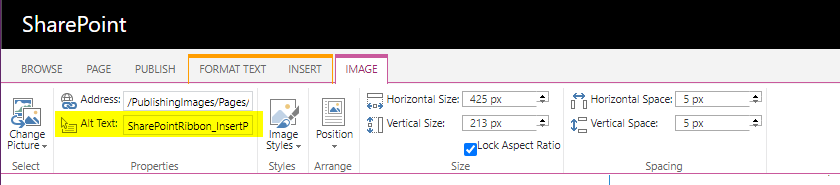
With the image highlighted, you can edit it from the Image tab in the ribbon
-
Address information refers to the location in the Images Library of the file, as well as the file name.
-
Alt Text should be added to the image. Alt Text provides a description of the image if a user cannot view it, for example if the user employs a screen reader.
- Finish editing the image and the page, then click Save in the Page tab of the ribbon. You’ll see a preview of how the page will appear to site visitors.
- When all of your edits are complete, click the Check In icon on the Page tab of the ribbon.
NOTE: You can verify that an image has Alt Text, without having the page in SharePoint Edit Mode. - Using the Chrome browser, right click on the image
- Select Inspect from the dropdown menu
- Source code for the image will be highlighted. Look for the class "img-responsive"
- Add file path for the image and Alt Text, shown as alt="..."
Responsive Images using Bootstrap Utility Classes
Visitors will be accessing the website from smartphones and tablets as well as desktop computers. The templates are designed to be responsive, but special content needs to be made responsive, too.
- To retain the aspect ratio of the image at all screen sizes:
- Wrap all images in a utility class (img-responsive) provided by the front-end framework, Bootstrap.
- Optionally, change the image shape to rounded, circle or add a thumbnail image using similar utility classes (img-rounded, img-circle, img-thumbnail).
View more Bootstrap documentation and code examples
- While the page with the image is in Edit mode, add the necessary code.
- On the ribbon Format Text tab, click the Edit Source icon to edit the HTML code for the page.
- Click OK when you’ve finished adding the code.

Tip: We recommend that you work closely with a web developer that is familiar with HTML/CSS to assist with adding these to the source code on your pages.